Wednesday, August 16, 2017

Edit DJI Mavic Pro 4K with FCP (X) Smoothly on Mac

The DJI Mavic Pro is a small yet powerful drone that turns the sky into your creative canvass easily and without worry, helping you make every moment an aerial moment. After recording some stunning 4K footage by DJI Mavic Pro, you may wanna edit these 4K videos in Premiere Pro so as to make them more stylish. However, the recorded MOV/MP4 files are compressed using the h.264 codec, which is final delivery codec and it is not one you want to use for editing. So, any workaround to help you work with DJI Mavic Pro 4K files in Adobe Premiere smoothly.


It is a pity that Apple's Final Cut Pro- FCP X (below 10.2 version), FCP 7 hardly supports 4K files from Mavic Pro. If you want to have a smooth DJI Mavic Pro 4K to FCP workflow, you are advised to convert Mavic Pro 4K video to ProRes in 1080p settings for further editing in FCP 6/7 and Final Cut Pro X at first.

With the help of Dimo Video Converter Ultimate for Mac, you can easily achieve the goal. With the professional 4K video converter for Mac, you can effortlessly encode DJI Mavic Pro 4K MP4/MOV footage for smoothly importing and editing in various non-linear editing systems (NLEs), including FCP, Adobe Premiere Pro, Avid Media Composer, Premiere Pro, iMovie, Davinci Resolve and more.

Free Download Dimo Video Converter Ultimate for Mac/Win:


Other Download:


Besides, this 4K Video Converter is also available to customize the output resolutions to any size like 1080p, 2K, 4K as users want. More than that, this software also can deal with other video formats such as H.265, MKV, MTS, MXF, XAVC, FLV .etc on Mac OS X including macOS Sierra, El Capitan Yosemite, Mavericks, Lion and even free download online videos from YouTube, Instagram, Twitter for editing and playing. Now, download the software on computer and follow the guide below to start conversion.

>> Alternative video converter tool you may need

Videomate (Mac/Win)

An all-around video converter software program that enables you to convert various video and audio files to formats that are supported by most NLE, multimedia devices and media players.

Converting DJI Mavic Pro 4K video to work in FCP

Note: If you are also a FCP X user, before you try to do the conversion, don't forget to make sure that you have installed the Apple ProRes Codec manually since the FCP X asks users to install it by themselves.

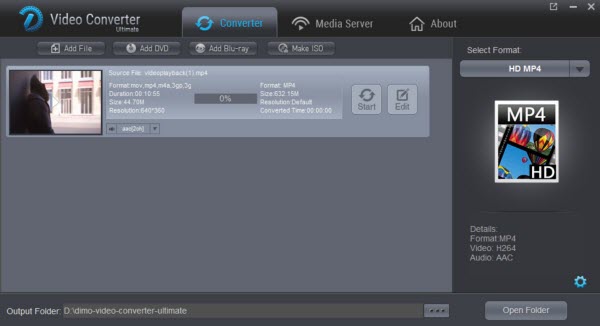
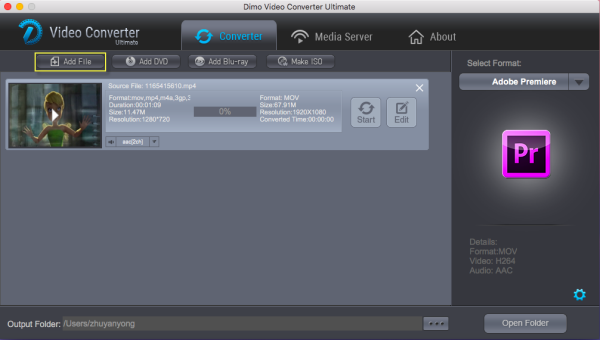
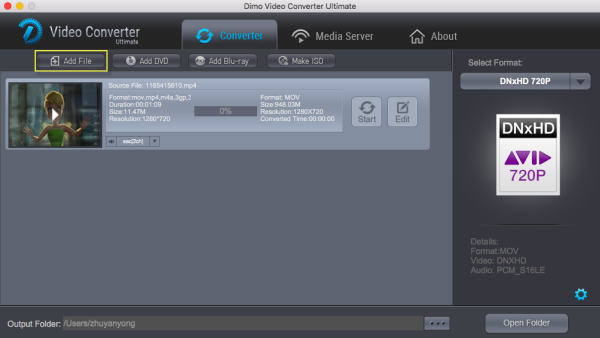
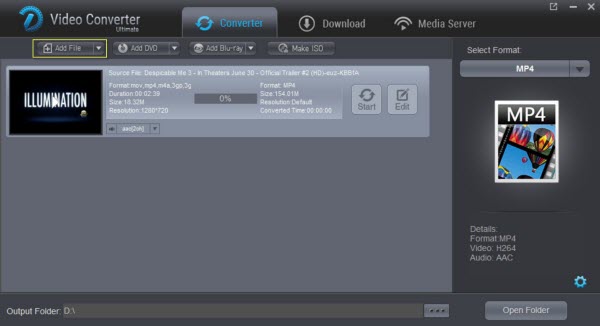
Step 1: Run the DJI video converting program you just set up. Drag and drop the 4K files from Mavic Pro which are copied to Mac hard drive to the converter. You can also hit "Add File" button to import videos to the app.


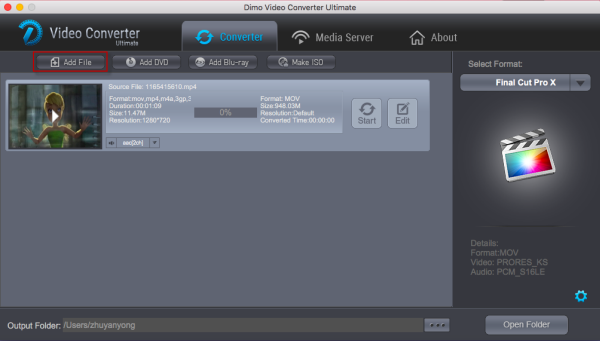
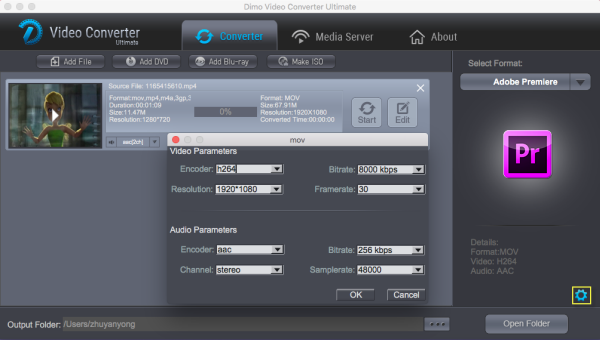
Step 2: Choose output format > Click "Select Format" bar and choose "Editor > Final Cut Pro X or Final Cut Pro 7" as output format for editing raw 4K in FCP with natively supported video codec.

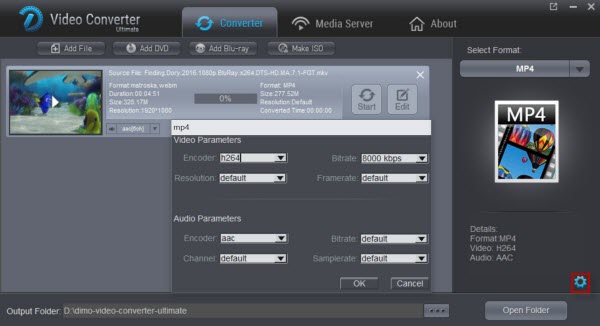
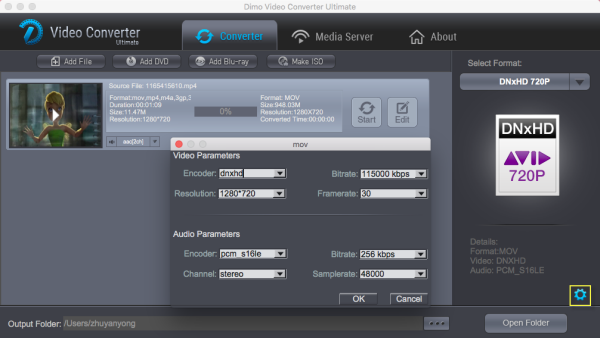
Step 3: Advanced V/A settings > Click "Settings" button if you'd like to customize advanced audio and video parameters like Video Codec, aspect ratio, bit rate, frame rate, Audio codec, sample rate, audio channels.


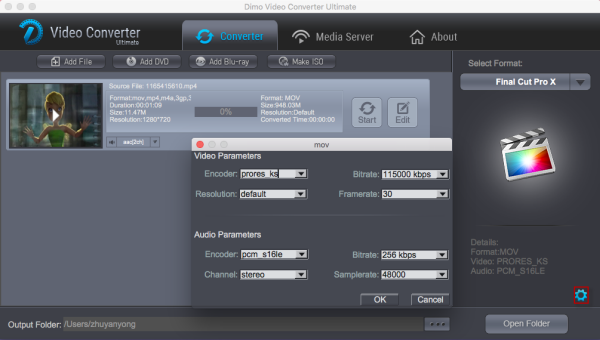
Note: Gnerally, 1080p is the optinal setings for FCP editing, so you can downscale 4K to 1080p. Of course, if you want to stick with the orignal 4K resolution, just keep the orignal video size.

Step 4: Start converting Mavic Pro 4K footage to FCP > Hit the "Start" button of the best 4K Video Converter for Mac. It will start converting DJI Mavic Pro 4K for importing to Final Cut Pro immediately. Soon after the conversion, just click "Open" button to get the generated files for natively editing in FCP 6/7 or FCP X for editing perfectly.

Tip: What to do after editing work in your FCP with Dimo

This DJI 4K video converter for macos Sierra can not only transcode 4K videos for FCP, but also convert FCP exported videos in different formats like MP4, AVI, MKV, MOV, FLV, etc., playback with 8K Player for Mac and share them onto mobile devices for watching wirelessly. Better still, you can make ISO for backup from your edited videos.

Free Download or Purchase Dimo Video Converter Ultimate for Mac/Win:


Kindly Note:

The price of Dimo Video Converter Ultimate for Mac is divided into 1 Year Subscription, Lifetime/Family/Business License: $43.95/Year; $45.95/lifetime license; $95.95/family license(2-4 Macs); $189.95/business pack(5-8 Macs). Get your needed one at purchase page.

Related Software:

BDmate (Mac/Win)

Lossless backup Blu-ray to MKV with all audio and subtitle tracks; Rip Blu-ray to multi-track MP4; Convert Blu-ray to almost all popular video/audio formats and devices; Copy Blu-ray to ISO/M2TS; Share digitized Blu-ray wirelessly.

DVDmate (Mac/Win)

A professional DVD ripping and editing tool with strong ability to remove DVD protection, transcode DVD to any video and audio format, and edit DVD to create personal movie.

Contact us or leave a message at Facebook if you have any issues.

Related Articles:

Source: How to Edit DJI Mavic Pro 4K in FCP (X) Natively?

Monday, August 14, 2017

Play or Edit 3DR Solo 4K Video in Premiere Pro

Getting caught by the editing issues when importing 3DR Solo 4K MP4/MOV footage in Premiere Pro CC/CS6/CS5/CS4? Simply follow this tutorial to find the easiest solution to fix the issue.


The 3DR Solo Drone was designed for the GoPro Hero 4 camera. 3DR has many features, such as cable camera, track, following me and taking selfies, which will allow you to capture great aerial photos and movies from every Angle. The 3DR Solo is top-notch, and the GoPro Hero 4 can be used in 4k UHD to shoot excellent aerial views, which can shoot 4k video at 30 frames per second, and 2.7k at 60 frames per second.
After 3DR Solo recorded some amazing 4K images, you might want to edit these 4K footage in Premiere Pro CCto make it more stylish before uploading to YouTube or Posting on Facebook. While Adobe claims that Premiere Pro CC can handle (usually) 4K files without much problem, many people find the painful experience of editing 3DR Solo 4K material in Premiere Pro CC. And now you and they will have a delayed play. In addition, Adobe PP CC can handle (usually) 4K files without many problems, but it is very hardware intensive. Here are the Premiere Pro CC optimized 4K playback Settings.

The list of 4k editing optimizations for Premiere Pro CC:

Hardware

CPU: minimum Intel i7-5930K or equivalent. AMD lagging way behind.
RAM: minimum 16GB, better 32GB or more
GPU: dedicated graphics with minimum NVidia GTX 780Ti, or GTX 970 or the higher end Quadro M4000. AMD have currently unreliable drivers.
GPU: VRAM minimum 3GB with 256bit memory bus
HDD: at least 100MB/s read/write speed

Premiere Pro CC Settings

Disable High-Quality Playback, gets you apx. 5-10% performance (Player Window/Wrench Icon/High Qaulity Playback).
INFO: Mercury Engine Transmit to second monitor, takes away apx. 5-10% performance (Player Window/Wrench Icon/Enable Transmit).
RedCode/Cineform movie files: Set playback resolution to 1/2 or 1/4 size will increase performace apx. 10-20% (Player Window/Full-1/2-1/4,etc.)
Increase Playback Preroll and Postroll time to 3-8 seconds for smoother playback, especially with slower harddrives (Edit/Preferences/Playback/Preroll-Postroll).
Disable Lumetri Scopes if not needed. They have been optimized in PP 2015.3 but you loose 3-8% performance when enabled (Window/Lumetri Scopes).

What if you're getting lag in playback while working with 3DR Solo 4K footage in Premiere CC/CS6/CS5/CS4? Thankfully you probably don't have to buy a new computer… In the professional world, 4K is a digital cinema standard that calls for a 4096 x 2160 pixel resolution. However, the majority of work is still being finished in 1080p. So before importing the 4K footage to Premiere for smooth editing without crashing your computer, you'd better downscale 3DR Solo 4K footage to 1080p and transcode the 4K stuff formatted/encoded in MOV or MP4 to Premiere more-editing friendly format, such as MPEG-2.

Actually, it's not as difficult as you imagine. What's need is a just a video converter for Mac like Dimo Video Converter Ultimate for Mac - The program works as the best Mac 4K Video Converter. It helps you fast transcode 3DR Solo, DJI Phantom 4, DJI Phantom 3, DJI Phantom 2 footage to Premiere Pro preferred MPEG-2 with fast encoding speed and without quality loss.

What's more, it's the optimal tool for transcoding GoPro, Sony, Canon, Nikon, Panasonic, etc camera or camcorder videos to kinds of NLE programs Avid Media Composer, Adobe Premier Pro, Final Cut Pro, FCE and more. For Windows user, please turn to Dimo Video Converter Ultimate. Just download it and follow the simple guide to achieve your goal.

Free Download Dimo Video Converter Ultimate for Mac/Win:


Other Download:


Converting 3DR Solo 4K video to work in Premiere Pro Pro

Step 1: Run the program you just set up. Drag and drop the 4K files to the Converter. You can also hit "Add File" button to import videos to the app. 


Step 2. Choose output format > Click "Select Format" bar and choose "Editor > Adobe Premiere" as output format for editing raw 4K in Adobe with natively supported video codec.

3. Advanced V/A settings > Click "Settings" button if you'd like to customize advanced audio and video parameters like Video Codec, aspect ratio, bit rate, frame rate, Audio codec, sample rate, audio channels.


Note: If you want to get original 4K resolution, just keep the video size as original. Or set resolution to 1920 * 1080, to compress source 3DR Solo 4K to 1080p.

4. Start converting 3DR Solo K footage to Premiere Pro> Hit the con button of the best 4K Video Converter. It will start converting 3DR Solo 4K for importing to Adobe Premiere Pro immediately. Soon after the conversion, just click "Open" button to get the generated files for natively editing in Premiere Pro CC/CS6 as well as CS5/CS4/CS3 perfectly.

Free Download or Purchase Dimo Video Converter Ultimate for Mac/Win:


Kindly Note:

The price of Dimo Video Converter Ultimate for Mac is divided into 1 Year Subscription, Lifetime/Family/Business License: $43.95/Year; $45.95/lifetime license; $95.95/family license(2-4 Macs); $189.95/business pack(5-8 Macs). Get your needed one at purchase page.

Related Software:

BDmate (Mac/Win)

Lossless backup Blu-ray to MKV with all audio and subtitle tracks; Rip Blu-ray to multi-track MP4; Convert Blu-ray to almost all popular video/audio formats and devices; Copy Blu-ray to ISO/M2TS; Share digitized Blu-ray wirelessly.

DVDmate (Mac/Win)

A professional DVD ripping and editing tool with strong ability to remove DVD protection, transcode DVD to any video and audio format, and edit DVD to create personal movie.

Videomate (Mac/Win)

An all-around video converter software program that enables you to convert various video and audio files to formats that are supported by most multimedia devices.

8K Player (Mac/Win)

A mixture of free HD/4K video player, music player, Blu-ray/DVD player, video recorder and gif maker.

Contact us or leave a message at Facebook if you have any issues.

Related Articles:
Source: How to Edit 3DR Solo 4K video in Premiere Pro

Thursday, August 10, 2017

Converting 4K Video to Ultra HDTV for Playing

Ultra HD TV sets are now available from most of the major TV manufacturers - i.e. Sony's impossibly slim Android TV, LG's OLED or Samsung's SUHD series of TVs. Although these 4K Ultra HDTVs can bring us the new standard of high definition, most of them still lack the support for HEVC/H.265 codec. So, how can play H.265/HEVC Video on Ultra HD TV? Well, the ultimate solution we figured out is to convert H.265 4K to Ultra HD TV for easier playback. Learn how to.


As we can see, 4K video formats are in a wide range which are downloaded from torrent sites. Some are commonly friendly with 4K Ultra TVs like MP4 or MKV, some aren't. And 4K uses the H.265 format (HEVC codec) rather than the H.264 format, which is still new and immature. Worse still, 4K requires the HDMI 2.0 standard - some 4K TVs don't even support. So if you plan to make all of those 4K torrent videos compatible with 4K UHD TV, there are two things you need to do first: downscale 4K to 1080p & convert 4K videos to UHD TV supported formats (eg. MP4, MKV) or size you need meanwhile.

Here, Dimo Video Converter Ultimate - a professional Ultra HD TV Video Converter can fast convertany 4K resolution to Full HD videos to faultlessly fit 4K Ultra HD TVs. The output content can be played on Samsung, Sony, LG, Toshiba, Hisense and Seiki 4K UHD TVs without any problem. It guarantees a 6x faster speed and untouched audio video quality to convert any UHD/HD/SD videos.

What's more, this video converter severs as a wonderful H.265/4K video player and H.265 encoder for you which will convert non-H.265 videos to H.265 for watching. And with the built-in video editor, you can personalize and retouch your videos in clicks. If you are a Mac user, pls turn to Dimo Video Converter Ultimate for Mac. Download the program and learn how to change 4K to HD for Ultra HDTVs compatible H.264 video on Windows or Mac (Windows 10 and macos Sierra included).

Free Download Dimo Video Converter Ultimate (Win/Mac):


Other Download:


How can we deal with 4K Torrent Movies for Playback with 4K UHD TV?

Step 1. Add 4K videos

Run the 4K Video Converter program and click "Add File" button to select your 4K video files (MP4, MKV, MOV, AVI , FLV , etc.,) you want to import. You can also directly drag the video files to the program for conversion.


Step 2. Choose 4K UHD TV supported video format

Choose 4K UHD TV playable HD MP4 or HD MKV under "Format > HD Video" from "Select Format" bar drop-down selections.

Step 3. Compress 4K videos (Optional)

Hit "Settings" and you can compress source 4K MOV/MP4/MKV,videos by choosing a smaller video size like "1920 * 1080" which is extract 1080p from the "Resolution" dropdown list.


Step 4. Convert 4K video to UHD TV

Once everything is settled for conversion, click "Start" on main interface to make your source videos converted. After conversion, you'll get the expected and desired video format well accepted by UHD TV.

Step 5. Transfer converted videos to UHD TV

You can find the generated files by clicking "Open" when the conversion is completed. Transfer them to an external USB hard drive and plug the drive into your UHD TV, or stream them to Apple TV, Plex, Roku, Chromecast or Dimo free media server, you will have no difficulty to watch 4K videos on your large screen UHD TV. Make sure the wireless network connection is accessible among the media server and your UHD TV at first.

Free Download or Purchase Dimo Video Converter Ultimate:


Kindly Note:

The price of Dimo Video Converter Ultimate for Windows is divided into 1 Year Subscription, Lifetime/Family/Business License: $43.95/Year; $45.95/lifetime license; $95.95/family license(2-4 PCs); $189.95/business pack(5-8 PCs). Get your needed one at purchase page.

Related Software:

BDmate (Win/Mac)

Lossless backup Blu-ray to MKV with all audio and subtitle tracks; Rip Blu-ray to multi-track MP4; ConvertBlu-ray to almost all popular video/audio formats and devices; Copy Blu-ray to ISO/M2TS; Share digitized Blu-ray wirelessly.

DVDmate (Win/Mac)

A professional DVD ripping and editing tool with strong ability to remove DVD protection, transcode DVD to any video and audio format, and edit DVD to create personal movie.

Videomate (Win/Mac)

An all-around video converter software program that enables you to convert various video and audio files to formats that are supported by most multimedia devices.

8K Player (Win/Mac)

A mixture of free HD/4K video player, music player, Blu-ray/DVD player, video recorder and gif maker.

Contact us or leave a message at Facebook if you have any issues.

Related Articles:

Source: How to play 4K Torrent Movies/Videos on UHD TV

Tuesday, August 8, 2017

How to Edit 4K Video in Premiere Pro CC/CS6 for free?

"4K" has become the hottest word in the digital photography and video field in recent years. With the continually emerging of 4K products such as 4K camcorders (Blackmagic 4K, Panasonic Lumix GH4, Sony PXW-Z100, Sony FDR-AX100, JVC HM-200, Sony F55/F5, etc.), we can obtain as many 4K video as we wish. The point here, you will find it a painful experience when editing 4K footage in Adobe Premiere Pro (no matter Premiere Pro CC, CS6, CS5.5, CS5 or CS4). Your computer freezes when editing the 4K video. So, what's the fluid workflow for editing 4K in Adobe Premiere smoothly?


Granted, Premiere Pro CC 7 (2017 included), CS6 can handle (usually) 4K files without much problem, but it is extremely hardware intensive. You probably don't like to invest a new computer, that means dead end? Humh, of course not,  but you do need to transcode 4K video to Premiere Pro using MPEG-2 (1080p) as primary delivery format. Here we will discuss how to edit 4K footage with Premiere Pro without bogging down your computer.

How to import and edit 4K video in Premerie Pro CC successfully?

To get a best solution for 4K video and finish the 4K video conversion task, the best Mac 4K video converter app, Dimo Video Converter Ultimate for Mac, is your best choice to transcode DJI, Nikon, Sony, Blackmagic, GoPro, Panasonic, Canon 4K video to Premerie Pro CC codec. With it, you can effortlessly transcode transcode 4K video, H.264(MP4), XAVC, XAVC S, etc footage to MPEG-2 for Premiere Pro.

What's more, it supports converting 4K files to various non-linear editing systems (NLE), including Avid Media Composer, Final Cut Pro, Camtasia Studio and more. If you work 4K files in Adobe Premiere Pro on Windows PC, please get Dimo Video Converter Ultimate to solve the issues.

Free Download Dimo Video Converter Ultimate for Mac/Win:


Other Download:


Convert 4K video files for Adobe Premiere Pro CS6/CC/CS6/CS5/CS4

Step 1. Load 4K Files

Run the program you just install, and drag and drop the 4K video files to the 4K converter. You can also hit "Add File" button to import videos to the app.

Step 2. Choose output format

Click "Select Format" bar and choose "Format" > "Editor" > "Adobe Premiere" as output format for editing 4K in Adobe with natively supported video codec.


Tips: Click "Setting" button if you'd like to customize advanced audio and video parameters like Video Codec, aspect ratio, bit rate, frame rate, Audio codec, sample rate, audio channels. However, please keep it default as original if you want to get original 4K resolution.

Step 3.  Start converting 4K files

Tab the "Start" button of this fastest 4K Video Converter. It will start to transcode 4K for importing to Adobe Premiere Pro immediately. Soon after the conversion, just click "Open" button to get the generated files for natively editing in Premiere Pro CC 2017 as well as CC7/CS6/CS5/CS4/CS3 perfectly.

Other tips to get best Premiere Pro CC Settings:

1. Disable High-Quality Playback, gets you apx. 5-10% performance (Player Window/Wrench Icon/High Qaulity Playback).

INFO: Mercury Engine Transmit to second monitor, takes away apx. 5-10% performance (Player Window/Wrench Icon/Enable Transmit).

2. RedCode/Cineform movie files: Set playback resolution to 1/2 or 1/4 size will increase performace apx. 10-20% (Player Window/Full-1/2-1/4,etc.)

3. Increase Playback Preroll and Postroll time to 3-8 seconds for smoother playback, especially with slower harddrives (Edit/Preferences/Playback/Preroll-Postroll).

4. Disable Lumetri Scopes if not needed. They have been optimized in PP 2015.3 but you loose 3-8% performance when enabled (Window/Lumetri Scopes).

Free Download or Purchase Dimo Video Converter Ultimate for Mac/Win:


Kindly Note:

The price of Dimo Video Converter Ultimate for Mac is divided into 1 Year Subscription, Lifetime/Family/Business License: $43.95/Year; $45.95/lifetime license; $95.95/family license(2-4 Macs); $189.95/business pack(5-8 Macs). Get your needed one at purchase page.

Contact us or leave a message at Facebook if you have any issues of importing 4K to Premiere Pro CC.

More Articles:

Source: Downsacle and Convert 4K to edit in Adobe Premiere Pro CC/CS6

Sunday, August 6, 2017

Sony a7S II 4K XAVC S to Avid MC Best Workflow

Avid Media Composer is the one of the most widely used NLE for professional film and video editing. With Media Composer 7, videographers gain accelerated workflows, automated media management, and extending real-time production. While, it still can't support well for some certain video formats like the new codec XAVC S. Here we will talk about the tricks for using XAVC S in Avid Media Composer beautifully. If you have some XAVC S to Avid Media Composer 7/6/5/4 for editing, read on to get some clues.


Sony has created a special free of charge AMA plug-in for Avid which provides support for XAVC and XDCAM/XDCAM HD files in Avid Media Composer. As we all know that Avid tools support MPEG-4 using QuickTime as well as using MediaReactor Workstation. However, QuickTime cannot handle XAVC-S form Sony and other manufacturer's cameras. MediaReactor can, but when adding them to Media Composer/Newcutter/etc, you must specify which reader you want to use.

1. To load an XAVC-S file into Avid software like Media Composer, right click on the bin to bring up a context menu.

2. In the file selection dialog, drop down the "Files of type" and make sure the MediaReactor line is selected.

3. You can then double click on the file, or click open, to bring it into the bin. If the MediaReactor plug in was not selected you will see Unsupported Format in the bin and Wrong Format when you try to play it. If it loaded properly, the bin should have a line that looks like this:

Alternative solution to transcode A7S II 4K XAVC S in Avid MC

Although the AMA plug-in and Media Reactor can solve some people's confusion about importing XAVC and XAVC S to Avid MC for editing, it's not for all the cases. Here is an all-in-one solution to import A7S II 4K XAVC S into Avid MC for you - that is, convert Sony A7S II 4K XAVC S to Avid Media Composer natively supported format like DNxHD .mov, instead of installing plug-in, so that your system runing on a smooth way. No matter the files you recorded is XAVC or XAVC S, as long as Avid MC recongnize them correctly, it's ok.

The process is surprisingly easy and can be done using Dimo Video Converter Ultimate for Mac, which is available for Mac and Windows users, which is an easy-to use, functional video converter and video editor. Developed with the most advanced converting technology, this Mac 4K video converter truly and fully supports input and output videos at upto 4K resolution.

With it, you can effortlessly convert your 4K videos formatted in MP4, MOV, XAVC, XAVC S, MXF to advanced encoders like DNxHD, MPEG-2, Apple ProRes and Apple Intermediate Codec, ensuring maximum editing quality and efficiency when working with Avid Media Composer, Adobe Premiere, Final Cut Pro, iMovie, Davinci Resolve, etc. If you're facing problems when editing 4K footage, just download it to convert the 4K stuff for smoothly importing and editing in your editing systems. If you’r using a Windows PC, simply turn to the Windows version here.  Below are steps on converting Sony A7S II 4K XAVC S footage for Avid Media Composer.

Free Download Dimo Video Converter Ultimate for Mac/Win:


Other Download:


Guide: Convert Sony A7S II 4K XAVC S For Editing in Avid Media Composer

1. Launch the 4K video converter for Mac, then drag & drop the 4K files onto the main interface, or you can click the "Add File" button to locate the videos from your local disk.


2. Click "Select Format" pull down list to select "Editor" and choose "DNxHD 720P" or "DNxHD 1080P" as the best video format for Avid Media Composer. The output videos will keep the original quality of MOV files and seamlessly fit Avid Media Composer.

You can click Settings to adjust video and audio parameters to get the best quality video. For smooth workflow of Sony A7S II 4K XAVC S video with Avid Media Composer, you are recommended to downscale 4K XAVC S to 1080p from "Resolution" drop-down selection.


3. Click the "Start" icon under the preview window, and the Mac video converter will start converting Sony Alpha A7S II 4K XAVC S to Avid Media Composer on Mac. When the conversion is finished, you can click "Open" button to get the generated MOV files effortlessly. Afterwards, you can launch your editing program to import converted 4K XAVC S clips into Avid Media Composer for further editing or uploading to YouTube.

Additional Tips:

a. This Sony XAVC S Converter Mac can also help you to encode XAVC/XAVC S video to FCP, iMovie, FCE, Premiere Pro, etc. You just need to choose a proper video format as output.

b. Apart from that, its built-in editor can help users to do some basic editing work before conversion, like trimming, cutting, cropping, adding effect/watermark etc.

Free Download or Purchase Dimo Video Converter Ultimate for Mac/Win:


Kindly Note:

The price of Dimo Video Converter Ultimate for Mac is divided into 1 Year Subscription, Lifetime/Family/Business License: $43.95/Year; $45.95/lifetime license; $95.95/family license(2-4 Macs); $189.95/business pack(5-8 Macs). Get your needed one at purchase page.

Related Software:

BDmate (Mac/Win)

Lossless backup Blu-ray to MKV with all audio and subtitle tracks; Rip Blu-ray to multi-track MP4; Convert Blu-ray to almost all popular video/audio formats and devices; Copy Blu-ray to ISO/M2TS; Share digitized Blu-ray wirelessly.

DVDmate (Mac/Win)

A professional DVD ripping and editing tool with strong ability to remove DVD protection, transcode DVD to any video and audio format, and edit DVD to create personal movie.

Videomate (Mac/Win)

An all-around video converter software program that enables you to convert various video and audio files to formats that are supported by most multimedia devices.

8K Player (Mac/Win)

A mixture of free HD/4K video player, music player, Blu-ray/DVD player, video recorder and gif maker.

Contact us or leave a message at Facebook if you have any issues.

Related Articles:

Source: Get Sony a7S II 4K XAVC S files Work in Avid Media Composer

Thursday, August 3, 2017

PIX-E5 4K Prores footage editing workflow in Adobe Premiere Pro CC/CS6

PIX-E5 is quite a powerful 5-inch monitor/recorder with a really nice 5-inch 1920 x 1080 display with touch screen functionality. The unit is built like a tank and uses a very useful and compact USB 3.0 based recording media – called the SpeedDrive to record up to 4K DCI at 30fps.  When you got some 4K Prores files from PIX-E5, you will be eagerly know the PIX-E5 4K video workflow. And this guide explores the best way to open and edit PIX-E5 4K Prores footage in Premiere Pro CC/CS6/CS5. Learn it now.


As far as we know, the latest version Premiere Pro CS6, CC usually can handle 4K files without much problem, but it is extremely hardware intensive. On the other hand, it is a complete nightmare to import PIX-E5 4K ProRes to Premiere Pro - it cannot recognize ProRes codec, and even worse than that is Adobe Premiere Pro(CC) will import a .MOV file of any codec -Animation/ProRes, whatever doesn't matter. Can't find ProRes in Adobe Media Encoder (CS6) on Mac? No ProRes preset in PPro CC? To solve the problem, you need to convert PIX-E5 4K ProRes files to Premiere Pro editing-friendly format, like H.264 MOV.

The process is surprisingly easy and can be done with Dimo Video Converter Ultimate for Mac. With it, you can effortlessly encode/re-encode PIX-E5 4K ProRes footage for smoothly importing and editing in various non-linear editing systems (NLE), including Adobe Premiere Pro, Avid Media Composer, Final Cut Pro, Davinci Resolve and more. Moreover, it can help you freely enjoy your 4K videos/movies, 4K YouTube clips, 4K camcorder recordings wherever you like, such as watching 4K movies (in any format) on 4K TV and even on mobile devices.

If you work PIX-E5 4K files in Adobe Premiere Pro on Windows, please get Dimo Video Converter Ultimate. Below is the detailed guide on transcoding PIX-E5 4K ProRes files to Premiere Pro best editting codec.

Free Download Dimo Video Converter Ultimate for Mac/Win:


Other Download:
Transcoding PIX-E5 4K ProRes to Premiere Pro friendly formats

Step 1: Load PIX-E5 4K footage

Run PIX-E5 4K Video Converter Mac and click "Add File" button, browse to the PIX-E5 4K ProRes footage and load them to the converter for conversion. 


Step 2: Choose a proper output format

Click "Select Format" bar to choose output format. For transferring PIX-E5 4K to Premiere Pro, you are recommended to choose "Editor" -> "DNxHD 720P" or "DNxHD 1080P".

Tip: Click the "Settings" button and set proper video/ audio parameters. You can reset set the video size, bitrate and fame rate. You can keep the original 4K resolution but also can adjust to 2K, 1080p video size just according to your needs. If you want to get original 4K resolution, just keep the video size as original.


Step 3: Start converting PIX-E5 4K ProRes to H.264

When you finish all settings, hit "Start" button to start transcoding PIX-E5 4K ProRes video for Premiere Pro on Mac. You can follow the conversion process from the pop-up windows. After the conversion, just click "Open" button to get the generated files and it would be easy to import PIX-E5 4K ProRes files into Premiere Pro CC/CS6/CS5/CS4 for natively editing.


Free Download or Purchase Dimo Video Converter Ultimate for Mac/Win:


Kindly Note:

The price of Dimo Video Converter Ultimate for Mac is divided into 1 Year Subscription, Lifetime/Family/Business License: $43.95/Year; $45.95/lifetime license; $95.95/family license(2-4 Macs); $189.95/business pack(5-8 Macs). Get your needed one at purchase page.

Contact us or leave a message at Facebook if you have any issues.

Related Articles:

Source: Issues Importing PIX-E5 4K ProRes to Premiere Pro - Fixed

Tuesday, August 1, 2017

Convert Mavic Pro 4K recordings to work with GoPro Studio

Just record video on DJI Mavic Pro is not a better choice, most players like to use the  iPad as the  display while flying the Mavic Pro. Then you can monitor the video well. However, there is a little trouble: Most players feedback that they put the SD card from the Mavic Pro into the Apple SD card reader for iPad. The iPad would not play the DJI Mavic Pro 4K video, even saying it did not recognize the video format. What's happening?


According to GoPro Studio official statement, GoPro Studio supports importing the following files in "Step 1: Import & Convert":

MP4 video files from the original HD Hero Original, HD Hero 2, HERO3, and HERO3+.
MOV video files from Canon and Nikon DSLRs (except in Windows 8).
JPG files from GoPro HD Hero, Hero 2 and Hero 3 cameras (.jpgs from other sources may work, but have not been tested nor are they officially supported).

And GoPro Studio supports importing the following file formats directly for editing in "Step 2: Edit": GoPro CineForm AVI or MOV files (MOV only on Mac). Audio formats: MP3, WAV, AIFF, M4A and CAF

While DJI Mavic Pro records:

Video:

MP4, MOV (MPEG-4 AVC/H.264)

Video Recording Modes:

C4K: 4096×2160 24p
4K: 3840×2160 24/25/30p
2.7K: 2720x1530 24/25/30p
FHD: 1920×1080 24/25/30/48/50/60/96p
HD: 1280×720 24/25/30/48/50/60/120p

However, GoPro Studio supports not all kinds of MP4/MOV formats, like some 4K MP4/MOV files with unacceptable high bitrate/resolution or big size from Mavic Pro. To be able to work with Mavic Pro 4K video files in GoPro Studio flawlessly, we would recommend transcoding them to a format that is well compatible with GoPro Studio.

Solution 1: Use GoPro Studio

To use GoPro Studio, you need to import the files, either .MP4 or .MOV, into Studio and then convert them to .AVI files, this is the normal process for Studio. Once converted, they can be edited as easily as GoPro files. At the conclusion, you can export the edited cut to a number of formats, including files intended for YouTube, Facebook and such. If you try to cut the original files, you get that message saying they are unsupported.

Solution 2: Use s a powerful alternative tool to GoPro Studio

Dimo Video Converter for Ultimate/Videomate is just suitable to your needs, which is an all-in-one video converter, player and editor. Overall, the program is the best Video Converter for DJI 4K footage. With this DJI 4K video converter, you can effortlessly transcode DJI Mavic Pro 4k MP4/MOV to AVI/H.264 MP4, which will create an GoPro Studio friendly file format keeping the DJI original quality.

Besides GoPro Studio, this software can also export DNxHD for Avid MC, MPEG-2 for Sony Vegas, Premiere Pro/Element, WMV for Windows Movie Maker and more NLE systems for native editing, even MP4 for iPhone/iPad/VLC/Kodi/QuickTime for playback smoothly. What's more, this video app allows you to trim clips, crop videos, add effects, insert watermark, etc as GoPro Studio does. For Mac(OS Sierra) users, Dimo Video Converter Ultimate for Mac is the alternative choice. Just download it and follow the tutorial below to get the work done.

Free Download Dimo Video Converter Ultimate (Win/Mac):


Other Download:

How to Convert DJI Mavic Pro 4K H.264 MP4/MOV for Editing in GoPro Studio

Step 1: Install and run Dimo Video Converter Ultimate, and then click the "Add File" button to load the Mavic Pro 4k videos.


Step 2: Click "Select Format" bar and choose AVI or MP4 from "Format > Video" or "Format > HD Video" as output format on the drop-down menu. 

Tip: Click the Settings icon to adjust video and audio parameters on the Profile Setting as you need to get the best quality video. To down-convert ultra HD 4K to 1080p, do remember adjusting video size to 1920*1080. That is the exact 1080p.


Step 3: Simply click the "Start" button to start converting and everything else will be automated. If you have added quite a bunch of video files, it would take some time to convert. You're done. Now your DJI Mavic Pro 4K H.264 MP4/MOV files will be converted into AVI/MP4 files ready to be imported to GoPro Studio perfectly.

Free Download or Purchase Dimo Video Converter Ultimate:


Kindly Note:

The price of Dimo Video Converter Ultimate for Windows is divided into 1 Year Subscription, Lifetime/Family/Business License: $43.95/Year; $45.95/lifetime license; $95.95/family license(2-4 PCs); $189.95/business pack(5-8 PCs). Get your needed one at purchase page.

Related Articles:

Source: Get 4K video from DJI Mavic Pro to wok in GoPro Studio